FISH POSE

Purpose
Here are some of the reasons why Fish Pose is good for you:
- Stretches the front of the body.
- Strengthens the upper back and neck.
- Improves neck mobility.
- Opens chest and throat.
- Stretches intercostal muscles.
- Lengthens the spine and improves spinal mobility.
- Stimulates blood circulation for digestive organs.
- Relieves tension in the throat and shoulders.
- Improves thyroid function.
Pose Guide
In order to do Fish Pose correctly, here are the steps:

- Begin seated on your mat with your legs extended out in front of you. Keep your legs together with your big toes touching. Let your arms rest at your sides.
- Lengthen your spine and engage your core. Tilt your earlobes up toward the sky, and relax your shoulders away from your ears.
- Rotate your shoulders behind you to draw your shoulder blades together, gently lifting the front of your heart. Forearms and elbows are resting on the ground, closely hugging the outside of your torso and hips.
- Actively press your forearms against the ground and begin to lift your chest as if there was a string attached to your lower sternum, gently pulling your heart towards the sky.
- Rotate your inner thighs in toward each other, and reach your toes out away from your knees (pointing your toes) to engage and lengthen your legs.
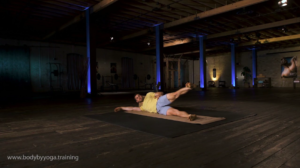
- Press your sit bones (glutes) and forearms into the ground and let your head drop back toward the floor while continuing to lift the chest toward the sky. Lengthen the neck as you extend it back, do not let it collapse down on itself. Rest the crown of your head lightly against the ground. There should be no real weight on the head. The weight is being supported by the forearms, core, hips, glutes and legs.
Practical Tips
Do This, Not That! Common mistakes beginners make:


1. Not engaging the inner thighs:
At a glance, it may not look like the legs are doing much in Fish Pose, but it is a mistake to make this assumption. Make sure you keep your inner thighs rotating in toward each other for the duration of the pose. This keeps the thighs strong and engaged, builds strength in the adductors and keeps the legs and hips in the proper position.
2. Letting the legs splay apart:
Do not let the legs roll out away from each other. Keep them actively engaged by pressing the insides of your legs against each other while practicing Fish Pose.
3. Not reaching through the feet:
Another common error in this pose is forgetting to maintain a reach through the feet. Lengthening the toes and balls of the feet away from the knees and hips simultaneously stretches and strengthens the legs.
4. Compressing the neck:
It’s very common to see beginners compressing the neck to get the top of the head to the ground. This is poor form and can be dangerous. Instead, keep the neck elongating as you lower it back. If you can’t reach the ground without compressing your neck, check out the modifications section below for ideas on properly supporting your head and neck during Fish Pose.
5. Not using the forearms:
Beginners can often forget to use their forearms during the pose actively. This is a mistake as it can lead to compression in the spinal column and put undue stress on the shoulder joints. Actively press your palms, forearms and elbows against the ground to lift the chest toward the sky, creating space between each vertebra.
6. Collapsing chest:
Fish Pose is a strong chest-opening pose. The chest should be actively lifting toward the sky at all times. Letting the chest collapse by neglecting to press through the forearms, or letting the shoulders roll out away from each other, can lead to a disc injury, spinal misalignment, vertebral grinding and more. Press the forearms down and roll the shoulder back and toward each other to get the safest and fullest expression of the chest-opening stretch.
7. Leading with the head and neck:
Many people try to initiate this pose erroneously with the head and neck, but this just sets the stage for spinal compression and possible injury. The highest point of this pose is the chest, and therefore, the primary force for creating the bend should come from the chest expanding forward and up toward the sky.
Props and Modification
You should consider a modification if you experience the following:
- Excessive tightness in the chest and shoulders.
- Hands too brittle or sore from placing under hips.
- Pinching in the lower back.
- Discomfort or limitation in the neck.
- Inability to reach head to the ground.
Modifications
Solutions to the above:
1. Excessive tightness in the chest and shoulders:
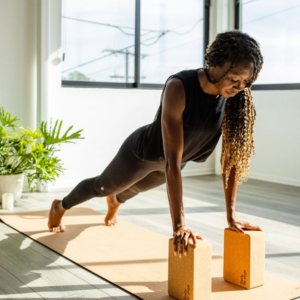
If your chest and shoulders are too tight to allow you to bring your elbows together on the floor behind you, alter the pose by placing a block laterally beneath your sternum (breastbone) so that it supports your shoulder blades. The block will be resting between your elbows, allowing more space for the shoulders and support for the upper back and chest.
You can also use a two-block arrangement to support Fish Pose. For this version, you will place one block as directed above, laterally beneath your shoulder blades. Place the second block laterally under your head for additional support. The second block will support the lower portion of your skull.

Another variation is to place a rolled blanket or towel laterally beneath your shoulder blades. The blanket roll will be parallel to the short edge of your mat extended out away from the body just beneath your armpits. This allows you to keep your shoulders on the ground.
You can lie on a bolster for support. For this variation, you will begin building the pose as instructed above. Instead of taking your hands beneath your hips, you will place the bolster so that the short end rests against your low back. The bolster will extend out behind you. Place your hands on the ground beside you to provide support as you roll down onto the bolster.
The bolster should be supporting the entire length of your spine. Your head will drop off the short end of the bolster. Let your arms rest on the ground at your sides. You can tuck your hands under the sides of your bolster or hips if that is available to you. Let your shoulders roll off the outer edges of the bolster to open the chest.
You can also try a variation that uses a block and a bolster. For this version, you will place a block laterally on its medium height to parallel the short edge of the mat. Then, place a bolster perpendicularly to the block. One short end of the bolster will be resting on the ground. The upper third of the bolster will be resting against the block, creating an inclined plane of support. Position yourself so that your low back is pressed up against the edge of the bolster that’s on the ground. Then lean back onto the bolster, as directed above.
For this variation, you will need a block, a bolster and a strap. You will place the block laterally beneath your shoulder blades. The bolster will be positioned horizontally beneath your head so that it is parallel with the short edge of your mat. Take your strap and grip it in each hand, palms out, so that your arms are as aligned with your shoulder joints as possible. Inhale, raising your arms with the strap overhead toward the ground. The tops of your arms will rest against the outer edges of the bolster for support. Adjust your hand position on the strap as needed for comfort.
2. Hands too brittle or sore from placing under hips:
If it is too uncomfortable for you to weigh your hips on your hands, place them just outside the hips with the elbows just outside the body hugging your ribs.
3. Pinching in the lower back:
If your lower back is experiencing pinching, you likely don’t have enough lift through the chest to get a full spine expansion. Try activating your glutes and drawing them down toward your heels as you lift your chest to the sky.
Alternatively, you can support your chest with a block. Placing the block beneath your sternum (breastbone) so that it supports your shoulder blades. Adjust the height of the block to provide the chest lift needed to decompress your lower back.
You can also adjust the position of your legs so that your knees are bent. As you bend your knees toward the sky, bring the soles of your feet toward your hips and plant them into the ground beneath your knees. This can help alleviate any excessive stress in the low back.
An even more supportive variation uses two blocks and an adjusted leg position. Place one block laterally beneath your shoulder blades. Place the second block laterally beneath the lower portion of your skull. Adjust the height of the blocks to your comfort level. Bend your legs, bringing your knees together and plant your feet on the ground a little wider than the shoulder’s width apart. Turn the toes in slightly toward each other. This leg position creates more space in the lower back, alleviating pinching and strain.
Another variation is to focus less on raising the chest and instead decrease the bend in the spine. Using a bolster under the spine is a good way to do this. For complete instructions on how to do this, see the modifications for #1 above.
4. Discomfort or limitation in the neck:
If it is excessively uncomfortable for you to drop your head back in Fish Pose, you can keep your head upright so that it’s in line with the rest of your spine. Your gaze will be slightly forward and up. Tucking your chin slightly while stretching your ears away from your shoulders can help elongate the back of the neck.
Giving the head some support by using a block underneath it can help you practice Fish Pose with limited neck strength and mobility without sacrificing the pose’s benefits. Place the block beneath the base of your skull so that it comfortably supports the weight of your head. Adjust the height of the block to your needs.
Note: This variation can also be used in conjunction with any modifications using blocks under the sternum.

5. Inability to reach your head to the ground:
If you’re having trouble reaching your head to the ground or have tightness elsewhere in the body, you can drop your head back unsupported. But only do this if you can keep the neck engaged and lengthened to avoid compression in the neck. Otherwise, read on for more options.
You can also place a block or rolled blanket beneath the base of the skull for additional support to make up the distance between your head and the ground. Adjust the height of your block or blanket to suit your needs.
Try placing a block on its medium setting beneath your shoulder blades, creating support and height to the chest. This will allow the head to rest gently and easily against the ground.
You can also place a block in its tallest position beneath your shoulder blades. For this variation, you can take your arms behind your head, holding opposite elbows in your hands, to support your head as it remains off the ground.
Alternatively, you can place a bolster or two beneath your back (as described more fully in #1), allowing your head to rest off the edge of the bolster for hanging support.
Pointers
Answers To Commonly Asked Questions:
- When is Fish Pose contraindicated?
- Should I be arching my back in Fish Pose?
- What do I do if I can’t get my elbows together on the ground behind my back?
- What if I feel pain in my neck during Fish Pose?
- How safe is this pose for those who have back pain?
- What should I do if I’m not flexible enough in my back or shoulders to do Fish Pose?
- If this pose is too difficult, what is a similar pose targeting the same areas?
1. When is Fish Pose contraindicated?
- Uncontrolled blood pressure imbalances.
- Acute migraine or tension headache.
- Acute chest, shoulder or neck injury.
- Spinal injury or disease, including ruptured, bulging or compressed discs.
- Acute back injury.
- Hernia.
- Vertigo.
- Cardiovascular disease – consult your healthcare provider.
- Pregnancy – consult your healthcare provider
2. Should I be arching my back in Fish Pose?
Fish Pose is a back-bending pose, but the arch should be long with space between each vertebra. Take care not to overarch or compress any area of the spine, particularly the low back and neck.
3. What do I do if I can’t get my elbows together on the ground behind my back?
You can employ several variations in Fish Pose if you can’t get your elbows together on the ground behind your back. Check out the modifications section above for options that can work for you.
4. What if I feel pain in my neck during Fish Pose?
· Stop the pose and find a way to support your head so that your neck is not at risk for injury or further limitation. See the modifications section above to find the variation that will work best for your needs.
5. How safe is this pose for those who have back pain?
As with any pose, if you can perform it correctly with the proper alignment, you should be safe. However, suppose you have compromised anatomy in the form of injuries, disease, excessive tightness or restriction in your muscles or joints. In that case, you may need to modify the pose to make it safer for your body. A good rule of thumb is to check with your healthcare provider before starting any new physical practice. Also, if it causes pain, don’t do it.
6. What should I do if I’m not flexible enough in my back or shoulders to do Fish Pose?
If you aren’t flexible enough to practice the full expression of Fish Pose, you can simply find a modified version that will accommodate your limited flexibility. See the modifications section above to find a variation that will work best for your needs.
7. If this pose is too difficult, what is a similar pose targeting the same areas?
You can look to any other chest-opening or back-bending pose for similar benefits. Camel Pose is a great place to start.
Additional Resources for beginners


Stretching and Strengthening your hips
In this workout we start slow to warm up your hips. Utilizing low impact workouts like this can be important for beginners and yoga veterans
Hatha vs Power yoga
We’ve created our own unique style of slow burn power yoga that combines Hatha yoga, power yoga, bodyweight exercises and physical therapy. This way in
The importance of maintaining correct alignment
Everything in your body is connected, so when one muscle isnt aligned properly it can be a slippery slope to injury. Building a solid foundation