
Do you suffer from back pain? Lower back pain can keep you from enjoying day to day tasks and can become a burden to both yourself and your loved ones. Just know that if you are dealing with back pain, you are not alone. Low back pain is actually more common than anywhere else in the back of the body. One study even found that, globally, low back pain affects more people than any other disability.
The good news is that yoga can help. Along with our yoga program specifically for back pain, here are some additional yoga poses you can do on your own that can help with lower back pain. For more free tutorials and yoga poses for back pain, check out these resources for back pain here.
1. Cat/ Cow- These poses are done by starting on the hands and knees. If you have too much pressure in the wrists or knees, you can always use a pad or roll up the edge of your mat for beneath them. With each inhale, arch your back and look up to the sky, and with each exhale, round your back, tucking your chin to your chest. Continue these movements at your own pace, linking the poses with your breath. If this is too difficult, you can also try this while sitting in a chair and resting your hands on your knees. You would then inhale to arch your back and exhale to round it. These stretches are great for opening up the back of the body and releasing strain and tension. (Ambien) Repeat this for at least ten breaths or as many times as you would like to.
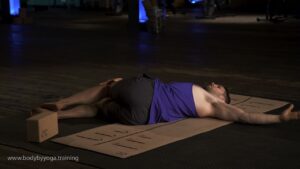
2. Reclining Twist- This is a great twist for the lower back. Start by laying down on your back with your knees bent and your arms out to the sides. Make sure your shoulders are always flat on the ground, and as you inhale, drop your knees over to one side, pressing the hips down and away. As you exhale, turn your head to the opposite side. If you can not bring the knees all the way over without lifting the shoulders from the ground, bring the knees back a bit. You also have the option to take your hand on the same side as the knees to the outside of the top thigh, gently deepening the pose without forcing it. Hold this pose for about a minute or as long as feels good for you.
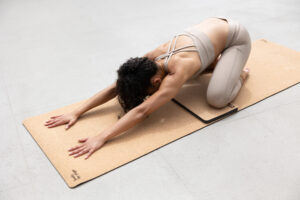
3. Child’s Pose- Start on the hands and knees. If you have too much pressure in the wrists or knees, you can always use a pad or roll up the edge of your mat for beneath them. On your next exhale, press your hips back towards your heels and bring your forehead to the ground. You can stretch your arms out in front of you or down by your sides. If your forehead does not reach the ground, fold your hands or use a block beneath it for support. You can also always use a bolster here, placing it beneath you and folding over it.Stay here for a minute or two and breathe deeply. When you are ready, inhale to come back up.
4. Happy Baby- This pose is done by starting on the back with the knees bent and in the air. The first option is to hug the knees in. For the deeper, full pose, bring the legs out to the sides and flex the feet, bringing your hands to your feet. If you can not easily reach your feet, you can reach for your shins instead, or you can use straps here, looping up the feet and holding onto the ends of the straps with your hands. Now, roll side to side, massaging out the lower back. Do this for as long as feels good for you and then inhale to come back to center and exhale to bring your legs out in front of you.
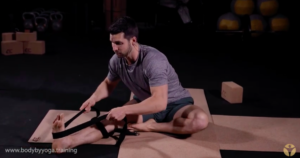
5. Reclining Bound Angle- Start on your back with your upper body flat on the ground. Bend your knees and drop them out to the sides, taking your feet together. Reach for the feet here if you can without lifting the upper body from the ground. If you cannot do this, you can loop up the feet with straps and hold on with the hands, or you can just let the feet come together without holding on to them. If your knees do not reach the ground, never force them down. For a deeper stretch, bring the feet closer in, and for less of a stretch, press them further away. You can also place blocks beneath the knees here for support. Stay here for at least ten deep breaths, or longer if you can. This is a great stretch for opening up the hips and releasing tension that has built up in the lower back.
How Long Should You Stretch to Alleviate Back Pain?
So, how long should your yoga practice be? What is the best length of a practice for relieving back pain? The truth is that this varies person to person depending on each individual and their needs. However, typically, a practice should be at least twenty minutes for the best results.
That being said, if you only have the time or energy for a few minutes of yoga, you can always start out shorter and work your way up to a longer practice. Even a few minutes of yoga is better than no yoga.
While you do not have to do a full hour of yoga each time for results, at least twenty minutes of yoga is usually the best recommendation to start alleviating back pain.
How to Use Yoga for Back Pain Relief When You are Also Working Out, Running, or Playing Sports?
For Rest Days- If you have a whole workout routine already, you can use yoga to stay moving on your rest days. When running, the lower back takes a lot of pressure as the feet hit the ground. This happens a lot when playing sports and with many intense exercises. This is why yoga on rest days can be so helpful. Yoga includes stretches for the back and can help to create expansion between the vertebrae, keeping the back properly aligned, and the muscles strong to protect the spine.
To Warm Up or Cool Down- If you are about to play a big game or run a race, using yoga as a very gentle warm up can be a great way to stretch out your muscles before a lot of exercising. You just want to be careful not to over-stretch the muscles and accidentally pull them. This is why it is even better to use yoga as a cool down so that you can stretch out your muscles after an intense workout routine, decreasing pain, and increasing proper posture and muscle strength.
10 Minute Routine for Lower Back Pain Relief
Did you know that even ten minutes of yoga a day can help with back pain? This is why we created a ten minute beginners sequence for back pain that you can try from home for free! Check it out below! This free sequence is from our Better Back Yoga program, available here.


Back Pain Relief
A reclined twist can help get rid of back pain or prevent it from happening. While in this position make sure to keep both
Tips to prevent back pain
Back pain can happen to anyone. We want to help you get ahead of it, so we put together some tips and classes to prevent

Can Yoga Cure Low Back Pain?
Yoga for Low Back Pain Do you deal with low back pain? If you suffer from low back pain, you are not alone. In fact,