Yoga Modifications After A Knee Injury
- Updated on: November 2, 2021
Yoga Modifications After Knee Surgery
Starting or returning to a yoga practice after a knee injury can be intimidating. The last thing you want to do is further damage your knee or experience further pain. Fortunately, there are precautions you can take, and modifications you can make, to ensure you’re keeping your knees happy throughout your time on the mat.
These modifications can help even those who haven’t experienced a knee injury, but feel knee discomfort sometimes during a class. In fact, many yogis often feel knee sensitivity in certain poses, and easy modifications and extra support can help prevent injury and make for a more enjoyable and effective practice.
Of course, you should only return to a practice after it has been OK’d with your doctor. Every injury is different, so be sure to discuss any specific questions about poses with a professional.
Understanding Knee Injuries in Yoga
The knee is a hinge joint, moving forward and backward in flexion (bending the knee) and extension (straightening the leg). However, it’s not a simple hinge joint, going only backward and forward. It also rotates — when the knee is flexed 10 degrees or more it can rotate internally (about 10 degrees) and externally (about 35 degrees). This allows us more movement potential, but also provides less stability.
The knee joint in the middle joint of the leg, connecting the femur (thigh bone) and tibia (shin bone). The hip joint is at the other end of the femur, and the femur connects to the pelvis at the hip joint. The ankle joint is at the other end of the tibia. Think of the three joints of the leg— the hip joint, knee, and ankle joint — acting in concert with one another. The movement of one joint influences another. Also remember that the tibia and femur are the two longest bones in the body— ensuring that the knee joint is always working hard, handling various types of movement demanded of it, while taking on the force of these two substantial bones as they act on each other to create movement. The knee joint often acts as a regulator between these two joints, and is informed by them as well.
For example, hip openers are a major area of concern for those practicing yoga with a recovering knee injury. These poses require hip rotation, and the knees will jump in and help by rotating, too. Often the problem occurs when the hip rotation just isn’t happening, but you continue to go deeper into the pose using body leverage, and your knee is pushed into deep rotation. This rotation, along with tension transferring force from the ankle or hip joint to the knee joint, can cause harm to the ligaments around the knee, resulting in pain or injury.
There are four main ligaments in and around the knee joint, which stabilize the joint and control its movement.
Two strap-like ligaments connect the femur to the tibia; these are called the co-lateral ligaments, with one on the inner side of the two bones (Medial collateral ligament – MCL) and the other (the lateral collateral ligament – LCL) on the opposite on the outside surface on the joint. A major job of these ligaments is to guard the tibia from slipping sideways.
There are also two criss-crossing (called cruciate) ligaments between the femur and tibia- the anterior cruciate ligament (ACL- attaches to the front of the tibia) and the posterior cruciate ligament (PCL- attaches to the back of the tibia). These ligaments are on the inside of the knee; the ACL is especially sensitive to injuries/ tears in yoga because one of its main actions which makes it taut (stretched, not slack) and therefore vulnerable- preventing too much inward rotation of a flexed knee. The ACL becomes more taut with the inward rotation of the hip as well, again, making it more vulnerable.
When it comes to knee pain, it’s also important to understand the points of contact and cartilage found in the knee.
The bony protrusions from your tibia and femur fit together perfectly when you’re leg is absolutely straight, but the way they slide against each other when you’re moving changes constantly. The points of contact are different, for example, when you’re in a lunge pose vs. when you’re in a squat.
The knee joint features two types of cartilage.
There’s a layer of articular cartilage at the end of the femur, the top of the tibia, and the back of the knee cap. Articular cartilage forms a smooth layer over these bone ends. As Dr. William Strerett, an Orthopedic Surgeon, writes: “The function of articular cartilage is to decrease the friction when a joint is moving, giving it more of a gliding function…The whole function of articular cartilage is to convert a cobblestone road into a marble drive. It becomes that slick.” Articular cartilage can get thinner from being “worn down” over years, or can be damaged from an injury or other conditions.
The knee joint also has meniscus- two C-shaped pieces of a different type of cartilage attached to the top of the tibia. Meniscus acts as the only cushion between the tibia and femur, and helps the knee joint in movements like flexion and extension. While articular cartilage forms a smooth layer to allow bones to glide over one another, meniscus is more spongy, absorbing some of the shock and force coming through the knee joint. Meniscus also creates more knee stability, as their cup-like shape allows the bumpy ends of the femur to more successfully meet the flat connecting area of the tibia. Unlike articular cartilage, meniscus does not wear down. It can also become inflamed from continuous pressure or certain conditions. Meniscus also experiences changes in brittleness, which can make it more vulnerable to tearing. The outer part of the meniscus (called the “red zone”) has better blood supply and generally heals from injuries faster than the inner part (called the “white zone”).
Knee pain can be caused by torn, irritated, cracked, inflamed, or fragmented cartilage or meniscus.
Tips for Returning to Yoga After a Knee Injury
1) If there’s pain in a pose, back off immediately. Even if you’re in a class, even if you’ve done those pose a hundred times before with no problem, even if your usual M.O. is to work through it. If you’ve had a knee injury, and you’re feeling pain or discomfort in your knee, carefully get out of that pose. Nothing is worth further damaging this sensitive joint that is so important to your everyday mobility.
2) You should probably avoid lotus pose. Lotus pose requires extreme hip mobility as it asks for deep hip rotation which can easily lead to knee and meniscus strain. Many yogis hurt their knees in this pose, even without a pre-existing knee issue.
3) Be mindful. Keeping proper alignment throughout your practice is critical to protecting your knees. Be aware of your knee in each pose, and where it should be. Make sure your knee is stable, and stay conscious of any pain or discomfort in the joint. Choose classes that are more gentle in nature. Often in a vigorous or fast-paced class, the transitions can get sloppy, especially if you’re just beginning to practice again. In a slower class, you’ll be able to mindfully enter and come out of each posture, and also to choose which poses you want to skip or modify more easily.
4) Engage your leg muscles and always keep knees and toes pointed in the same direction. Engaging your leg muscles provides more stability for the knee and ensures that the knee isn’t taking on additional pressure from trying to compensate for a non-active muscle. Keeping your knees and toes pointed in the same direction helps to keep your knee from rotating out or in.
5) Support your knee with props. Always bring a blanket (or two or three) to your mat and use them to support your knee in poses and reduce the amount of pressure on your knee (see pose modifications below). Also, using props even in non-knee related ways (like using a block in half-moon pose, for example) can help you to struggle less and truly engage more- again, making it easier to activate those leg muscles and protect your knee.
5 Pose Modifications for After a Knee Injury
1) Easy Pose- Sukhasana (sitting pose)
Many practitioners experience discomfort in this pose but skip using props because they feel it’s too “easy” of a pose to use support for. Not the case! Many classes begin in Easy Pose, and it can really set the tone for your whole practice, as well as start to open your hips. Set your tone to mindful, fully comfortable, and body and knee awareness by placing rolled blankets underneath your knees and sitting on a folded blanket or two as well. Take the time to experiment and find the sitting pose that provides you with the most ease.
2) Child’s Pose – Balasana
Child’s pose requires a high level of flexion that may not be suitable for vulnerable knees. Support yourself by placing a block under your sitting bones and a folded blanket directly behind the knees. Lying on top of a bolster can also provide more support.
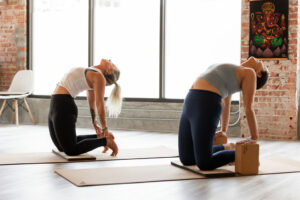
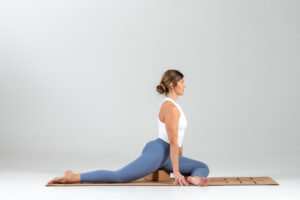
3) Low Lunges – Anjaneyasana
If you can practice low lunges, placing a blanket (or a few blankets) underneath the grounded knees can provide support and reduce the pressure in your knee. Be sure to activate the leg muscles and fully engage your core- when all of the other muscles are doing their jobs, the knee has to do less work and take on less tension. Be sure not to over-bend your knee. Experiment with bending no further than just short of your ankle.
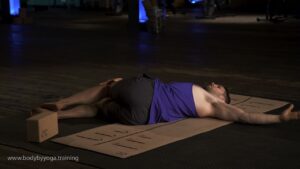
4) Pigeon Pose – Kapotasana
Pigeon pose, or half-pigeon pose, is another asana that even those without knee injuries often feel knee discomfort in. Before returning to the most common variations (in which blankets can offer support and lessen the pressure on the knee), experiment with a reclined pigeon variation (known as Thread the Needle for Figure 4) that instead follows the same alignment principals of Pigeon pose as you lie on your back with one anklebone crossed on top of the opposite knee, threading your right arm through the space created between the legs or using a strap.
Recent Posts
Categories
Related Articles

Breathing technique to improve your yoga practice
Other ways to stay involved
Back Pain Relief
Yoga for the inflexible
Related Articles
Yoga for the inflexible
I’m sure you’ve said it or heard it before, “I’m not flexible enough for yoga.” Today we’re going to DEBUNK that thought. Any body can
Pigeon Pose Modifications | How To Modify Pigeon Pose When You Are An Inflexible Beginner
Pigeon pose is a helpful stretch for the hips and glutes. It’s one of our favorite poses and it’s a must for anyone who is
Beginner’s Modifications For Thread The Needle Pose
Thread The Needle is a restorative pose that can help stretch your shoulders, neck, and back while increasing mobility in the spine. However, you should