WARRIOR 1:

Purpose: Here are some of the reasons why Warrior 1 is good for you:
- Invigorates and energizes the entire body
- Strengthens the legs and feet
- Tones abdominals and surrounding core muscles
- Improves balance and stability
- Increases mental focus and concentration
- Stretches arms and shoulders

Pose Guide: In order to do Warrior 1 correctly, here are the steps:
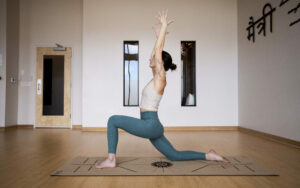
- Begin by standing at the top of your mat with your feet hip’s width apart.
- Step your left foot back 3-4 feet, keeping a hip’s width distance between both feet.
- Pivot on the left heel to point the toes out to the left at a 45-degree angle.
- Bend the front knee so that it stacks on top of the front ankle. Press firmly through the heel, making sure not to let the heel lift away from the ground.
- Internally rotate the back hip while you engage the thighs and glutes and press both feet into the ground.
- Engage your core as you lengthen your spine.
- Activate the back foot lifting the arch away from the ground to find full contact with the outer edge of the foot. The toes, balls and heel of the foot are also firmly rooted and pressing into the ground.
- Keeping your chest facing forward, raise your arms overhead with your palms facing each other. The elbows should be straight but not locked. The fingers are reaching up to the sky.
- Lift the crown (top) of the head to the sky by lengthening the back of the neck. Keep the chin parallel with the ground.
- Lower the shoulders down away from the ears.
- Press down through both feet as you stretch your spine.
- Repeat on the other side.
Practical Tips:
Do This, Not That! Common mistakes beginners make in Warrior 1:


1. Arching the back:
There is a common tendency to arch the back in Warrior I, but this is not a back-bending pose. Keep your spine elongated and straight to do this pose correctly, maintaining a straight line from the shoulders to the hips. This keeps the spine aligned for maximum safety and benefit in the stretch.


2. Raising the shoulders toward the ears:
It’s a common mistake for beginners to elevate the shoulders up around the ears when doing poses where the arms are raised overhead. This compresses the bones of the neck and shortens the neck and shoulders muscles, creating unnecessary tension and possible nerve impingement. It is better to lower the shoulders away from the ears while lifting the crown of the head to the sky.


3. Compressing the neck:
Another common mistake is creating more stretch by tilting the chin up toward the sky. This compresses the bones of the neck and the skull base, placing strain on the delicate soft tissues that support this vulnerable area. The correct form is to lift the crown (top) of the head toward the sky while stretching the back of the neck and keeping the chin parallel to the ground.


4. Incorrect foot placement:
The proper alignment is to have the feet positioned to remain the hip’s width apart despite one behind the other. The back foot should be at a 45-degree angle, while the front should have toes facing forward.


5. Misalignment in the front knee:
Do not let the front knee move right or left, but keep it stacked directly over the ankle.


Also, keep the front knee from moving too far forward. If you find your front knee moving forward during the pose, you can move your front foot forward to keep the knee aligned over the ankle.


6. Having feet too far apart from each other:
Beginners often mistake taking the feet too far apart from each other, creating an overly long stance. In the beginning, though, it can be beneficial, begin with a shorter stance to accommodate limited mobility in the hips and ankles.


7. Taking the chest too far forward:
Many people push the chest too far forward in an effort to go deeper into Warrior I. This is incorrect. The proper alignment is to keep the spine erect with the shoulders directly over the hips. Engage your core and lengthen your spine to support the low back. Activating the thighs and feet can create additional support and stability for keeping the spine upright during this pose.


8. Not pushing through back heel:
Be sure to press down through your back heel. Beginners can sometimes find the back heel lifting off the ground, especially if the ankles are tight. Press down through the back heel to create the proper foundation to provide stability needed to safely hold the rest of the pose.
Props and Modifications:
You should consider a modification for Warrior 1 if you experience the following:
- Discomfort in the hips, knees, ankles or feet
- Excessive back pain/discomfort or tension
- Discomfort or restriction in the shoulders
- Difficulty maintaining balance
1. Discomfort in the ankles or feet:
If you have excessively tight ankles or feet, you can adjust the position of your back foot so that it is parallel to the front foot.
Alternatively, you can curl the back toes under to remain on the ball of the back foot while keeping it aligned with the rest of the leg. The heel will be elevated and pointing behind you; the toes will be pointing forward. This is also called High (Crescent) Lunge.
2. Discomfort in the knees:
For knee injury or excessive knee tension, you can modify this pose to a Low Lunge by lowering the back knee and foot to rest on the ground. The back foot should not rotate but should remain in line with the rest of the leg. Placing a folded blanket under the back leg can add additional comfort and support.
You can also widen your stance to relieve excessive strain or tension in the knees. To do this, widen the lateral space between your feet to a little wider than the hip’s width apart. This gives space to your hips so that you can turn them toward the front of the mat more easily.
If widening the stance still hurts your knees, you can also decrease the angle of the back foot so that it points more toward the front of the mat. This allows your ankle and knees to be facing the same direction as your hips, preventing additional strain on the joints.Another option is to allow your hips to rotate toward the back leg instead of keeping them squared to the front of your mat. Turn your torso forward from the ribs and chest rather than the pelvis, creating space and freedom in your knee and hip joints.
3. Discomfort in the hips:
If you have overly tight hips or sciatic pain, one option you can do is to take a lunge stance that is wider than your hips. This creates more space and freedom in your knee and hip joints.
Another option is to avoid rotating the back foot. Instead, curl the back foot’s toes under, lifting the heel off the ground to remain on the ball of the foot. Align the back foot with the rest of the leg. The elevated heel will be pointing behind you, and the toes will be pointing forward. This is also called High (Crescent) Lunge.
4. Excessive back pain/discomfort or tension:
If you feel excessive strain in the back, you can shorten your stance so that the back foot is closer to the front foot. The distance between the feet laterally should remain at the hip’s width.
You can also shift forward and place your hands on your front thigh or rest them on your hips. This can soften the strain on the back during the pose.


Alternatively, you can place your front foot on a block to elevate the pose. This is especially helpful if you have very tight hip flexors.

5. Discomfort or restriction in the shoulders:
If you experience pain or discomfort in your shoulders during this pose, you can do it without raising your arms overhead. Simply place your hands on the front thigh or resting on your hips. Keeping the feet actively engaging against the ground can be extra helpful in this modification. You can also raise your arms in a “touchdown” position instead of straight up.

6. Difficulty maintaining balance:
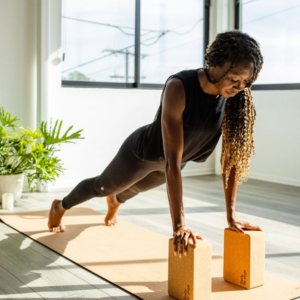
If you struggle with keeping yourself balanced in this pose, you can place a block on either side of the front foot. Lower your upper body so that your palms rest on the blocks and adjust the placement of the blocks to ensure they are directly under each shoulder.
Alternatively, you can practice this pose against a wall. To do so, begin by standing facing the wall. You should be about one foot away from the wall in front of you. Follow the instructions above to come into the pose. Instead of raising your arms overhead, rest them against the wall in front of you for support and stability. You can also perform the same modification with a chair.

Those with limited mobility can also practice this pose seated on a chair. Follow the same steps as above using the seat of the chair as support below the back leg. Once lowered into a lunge position, check to ensure that your hips are squared, your back foot is rotated 45 degrees, and your front knee is over your front ankle. Raise your arms one at a time to the extent that your mobility permits while bracing the chair for support.

Pointers
Answers To Commonly Asked Questions About Warrior 1:
- What muscles does Warrior I work with?
- Should I arch my back in Warrior I?
- When is Warrior I contraindicated?
- How deep should I go in Warrior I?
- What is the difference between Warrior I and High (Crescent) Lunge?
1. What muscles does Warrior I work?
- Strengthens the muscles of the core, hips, legs and feet
- Lengthens and strengthens the muscles that support the spine
- Stretches the hip flexor muscles, alleviating back pain and tension
2. Should I arch my back in Warrior I?
- No, Warrior I is not a back-bending pose. In order to do this pose correctly, keep your spine elongated and straight, maintaining a clean line from the shoulders to the hips. Equally engaging the muscles of the front and back of the body supports the spine for maximum safety and benefit in this pose.
3. When is Warrior I contraindicated?
- Acute neck and shoulder injuries
- Acute sciatica pain
- Vertigo or other impairments to balance
- High blood pressure or other cardiovascular diseases.
4. How deep should I go in Warrior I?
- You should only go as deep as you need to in order to feel a stretch. Everybody is unique, so everyone will have different reference points for how deeply they will go into this or any pose.
5. What is the difference between Warrior I and High (Crescent) Lunge?
- In Warrior I, the back foot is flat on the ground at a 45-degree angle to the body. In High (Crescent) Lunge, there is no rotation in the back foot, and the back heel is elevated.
Additional Resources for beginners


Stretching and Strengthening your hips
In this workout we start slow to warm up your hips. Utilizing low impact workouts like this can be important for beginners and yoga veterans
Hatha vs Power yoga
We’ve created our own unique style of slow burn power yoga that combines Hatha yoga, power yoga, bodyweight exercises and physical therapy. This way in
The importance of maintaining correct alignment
Everything in your body is connected, so when one muscle isnt aligned properly it can be a slippery slope to injury. Building a solid foundation