
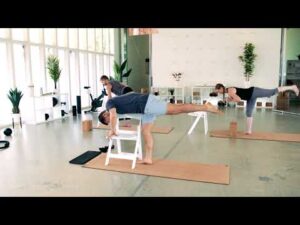
Chair Yoga
Did you know that you can do yoga while sitting in a chair?
Did you know that you can even use a chair as a prop?
Practicing yoga with chairs is an amazing way to make yoga more accessible to people of all abilities and levels. Many older adults find that chair yoga is helpful for being able to properly practice. The great part is that chair yoga allows you to experience the benefits of the poses you would normally do, but with a chair for support.
So, why is chair yoga becoming so popular and how can it help you with your practice?
Why Should You Use Chairs for Yoga?
Chair yoga can be helpful for numerous reasons. To start, it allows support for those who cannot stand up for long periods of time.
Injury/ Mobility Restrictions- Whether a student is older, has an injury, or just needs a bit of extra help with their practice, chair yoga is a great option for anyone. Even people who can do a regular yoga practice might find that chair yoga actually gives them the necessary support to deepen a pose. For those who struggle with mobility or past/chronic injuries, chair yoga can be especially helpful to support and assist during a practice.
Balance Assist- Chair yoga can help to increase balance as well. If someone is struggling with their balance but wanting to have a yoga practice, using a chair can give them something to hold onto in order to support their stability and allow them to do the poses. One study brought chair yoga to an assisted living community, offering chair yoga twice a week for eight weeks. The participants involved were between the ages of sixty-eight and ninety-seven, and those who were eligible had fallen within the past six months, resulting in a fear of falling again. After eight weeks of chair yoga practices, the participants had better mobility, less risk of falling, and a reduced fear of falling as well. This allowed them to be more social and feel less anxious in general knowing that their balance had increased and they had less of a chance of falling again. (Galantino, et al.)
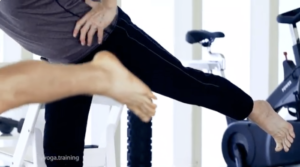
Help With Inflexibility- For those who struggle with flexibility, chair yoga is a great way to be able to have a yoga practice without needing to go as far into the poses. By having the chair as a support, you can modify harder poses to make them more accessible. The chair can be used as a prop as well during standing poses.
Who Should Use Chairs with Yoga
Chair yoga is also used among adults who suffer from dementia and alzheimer’s, giving a safe space to sit and practice exercises without having to stand and risk falling. In addition, people who have suffered from injuries and have trouble standing but want to practice yoga can do so while sitting in a chair. For those who are simply afraid of falling, chair yoga is also a great option. Chairs can also be used as props to modify a pose, making the pose easier to do while supporting you through it.
The truth is that chair yoga can be helpful for anyone at all who needs it. From older adults to those who just want to spend more time working on a pose while sitting down, chair yoga is always available.
How to Get the Same Benefits out of Every Yoga Pose with a Chair
Each yoga pose offers many unique benefits. The question is, can you receive the same benefits when doing yoga with chairs?
The variations of poses that a chair offers are specifically designed to mimic the original poses, giving the same benefits. Let’s take a look at some situations that might require someone to use a chair.
For example, let’s say that you were trying to practice cat/cow. This pose is usually done on the mat on your hands and knees. On the inhales, you would look up to the sky and arch the back, pressing down through the palms, and on the exhales, you would round the back, tucking your chin to your chest. For many who have suffered from injuries in the knees or the wrists, this pose might not be doable. In this situation, there would be the option to do this pose from a chair. In this variation, as you sit down, you would inhale to look up to the sky while resting your hands on your thighs, and exhale to tuck the chin to the chest, rounding the back, and repeating at your own pace. You can see how this pose is very similar either way you choose to do it, but the benefits will be the same. The chair yoga version would be easier on the hands and wrists while still allowing you to practice the poses.
Another example would be if you wanted to practice a wide leg forward fold. This is usually done with you standing with the feet apart and folding forwards from the hips, keeping the legs straight. For some, this might be too intense, and there might be too much pressure in the legs here. For those who can not easily do this pose standing, there is the option to sit in a chair with the legs out to the sides and you fold forward, bringing the hands to the ground, or to a block if you can not quite reach. You can see how this would take the pressure out of the legs while still giving you a hip opener and a gentle inversion.

5 Chair Yoga Poses for Beginners
1. Downward Facing Dog
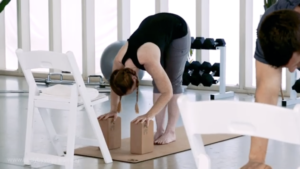
This pose is a great one for stretching out the back and strengthening the arms and legs. This is usually done by starting on the hands and knees, tucking the toes, and pressing the hips up and back as you keep the spine straight. When doing this pose with a chair, you would have two options. One would be to stand up and turn to face the chair. You would then bring both hands to the seat of the chair and step the feet back until the spine is long, and then you would hold the pose here while taking deep breaths.
Another option is to stay seated in your chair while placing two blocks out in front of you. From here, you would place your feet on the ground out to the sides and fold forwards, bringing your hands to the blocks until you could stretch through the back of the body.
2. Side stretch or Crescent Moon Pose
This pose is usually done while standing and bringing the hands together overhead. From here, you would lean to one side, pressing the hands away while breathing into the stretch here. On an inhale, you would come back up and on an exhale you would come over to the opposite side.
When sitting in a chair, this pose can be done the same way, just while sitting down. Another option is to use a strap here while seated, and hold onto both ends of the strap in the hands. On an exhale, you would come over to one side, holding the strap tightly. You would then inhale to come up and exhale to lean to the opposite side.
A third option would be to just bring your arm up and lean to the opposite side as you stretch. You would then repeat on the other side.
3. Half Lord of Fish Pose
This pose is usually done sitting down on the mat with the legs out in front of you. You would then lift one leg up and cross it over the other leg, bringing your heel to your opposite hip. You would then bring the arm on the same side of the bent leg back behind you. Then, you would inhale your other arm up, and exhale to cross it over to the outside of your bent leg, bringing your arm to your thigh, and breathing here.
To do this pose in a chair, you would bring one leg up and cross it over the other thigh, keeping your foot flexed. From here, you would bring your arm (from the same side as your bent knee) up and reach it around to the back of the chair. Next, you would inhale your opposite arm up and exhale to cross it over, bringing your elbow or forearm to your thigh to twist.
One more option is to do this pose without crossing the legs if that is more accessible for you.
4. Seated Forward Bend
This pose is pretty simple to do. Usually, it is done by sitting on the mat with your legs out in front of you. From there, you would inhale as you reach to the sky and exhale, reaching for your toes while you keep your spine long. If you could not reach your toes, you would have the option to fold over a bolster, use blocks outside of the legs to reach towards, use a strap to wrap around the feet, or simply rest your hands on your legs.
When sitting in a chair, you would start by bringing both feet out in front of you and flexing them. On the inhale, you would bring your feet up, and on the exhale, you would reach in the direction of your toes. You do not need to worry about touching your toes here. You also have the option to loop a strap around your feet here and hold onto it with your hands, or simply rest your hands on your legs. Make sure to keep your spine long and not round your back.
5. Five-Point Star Pose
Usually, this pose is done while standing up and stepping the feet out to the sides. You would then extend through the upper body, pressing the hands up and out to the sides. When sitting in a chair, you can actually get an even deeper stretch here. If you do the pose in a chair, you would start sitting down and bring the feet out to the sides. You would then extend them up and out while reaching the arms up and out. From here, you could gently arch the back over the back of the chair, finding a gentle backbend. Take a few deep breaths here and then exhale to come back out of the pose.

5 Difficult Poses That Can be Modified by a Chair
Some poses are just too difficult for everyone to do, and that is why there are always variations and modifications for every pose. Using a chair allows extra support, making poses more dobale for everybody. Let’s look at five difficult poses below to see how to modify them with a chair.
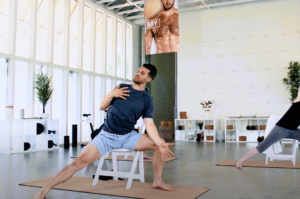
1. Triangle Pose
To do this pose, you would usually start with the feet three to four feet apart from one another. Your front foot would be facing forward and your back foot would be turned at a forty-five degree angle. From here, keeping your legs straight, you would fold over the front leg, bringing your hand inside of it, and reaching towards the ground. If you could not reach the ground, a yoga block could be used here as well.
To do this pose with a chair, you would have a few options. The first could be done sitting down. You would bring the feet out to the sides with one foot facing in and the other facing away from you. From here, you would fold over the leg that is facing away from you and bring your arm inside of it, taking the hand to the ground or to a block. If it is too much to have the feet facing the way that they are, you can also turn them both to face forward instead. Another option would be to do this pose standing as you usually would, but bringing your hand either to the back or the seat of the chair as you fold towards the front leg.
2. Eagle Pose
This pose is usually done standing up with one leg crossed over the opposite thigh, and the arms wrapped around one another until the hands come together. This is one of the most difficult poses to do, and that is why it has many variations.
If you want to do this pose sitting down, this would be the easiest way to try this pose. If you choose this variation, and you were to start on the right side, you would begin by inhaling the right leg up and exhaling to cross it over the left thigh, flexing the foot. From here, you would wrap the left arm over the right. You would then have the option to just give yourself a hug or to bring the arms all the way around one another until the hands meet. You would then hold this for a few breaths and then repeat on the other side.
Another option would be to start standing up behind a chair, holding onto it for support. If you were to start with the right side, you would inhale your right leg up and exhale to bring it over the left thigh. You would then have the options to cross the left hand over the right on the chair, to release the chair (only if you are able to) and give yourself a hug, or to bring the arms all the way around to join the hands together. You would then hold this for a few breaths and then repeat on the other side.
3. Tree Pose
This balancing pose is usually done by bringing one foot to the opposite thigh and bringing your arms up above you. Some variations of this pose include bringing your heel to your ankle with the toes on the ground instead, or bringing your foot up to your shin. Your hands could be at the heart center, out to the sides, or up to the sky.
Now, if you were doing this pose with a chair, you would have a few options. The first is to do the pose as you normally would while keeping both hands (or just one) on the chair for support.
The next option would be to bring your bent knee to rest on top of the seat of the chair if you can easily reach it. If not, you would have the option to roll up some blankets or a pillow to place on top of the chair seat, giving you a place to rest your knee.
4. Warrior III
This pose is usually done by standing on one foot and bringing your opposite leg up and back behind you, bending forwards, and keeping the spine long. The arms would be out in front of you or out to the sides. To do this pose using a chair, you would start by standing up and holding onto the chair with both hands. From here, you would begin to shift the weight into one foot, bringing the opposite foot up and back behind you and you fold over the chair. Take your time coming into the pose here, and never rush into it. Hold the pose for a few breaths and then come back down on an exhale.
5. Pigeon Pose
This pose is usually done on the mat with one leg extended behind you and the other crossed in front of you. You would then have the option to fold forward here. When doing this pose in a chair, you would start by sitting up tall and crossing one ankle over to your opposite thigh. Keep the knee out to the side here and the foot flexed. If this were too intense, you would have the option to cross the leg all the way over. From here, you would inhale to sit up tall, and on the exhale, you would have the choice to fold over the leg. If you choose to fold forward, you could either rest your hands on your leg, on the ground, or on two blocks. Whichever you choose, hold for a few deep breaths and then inhale to come back up.
Different Ways to Use Chairs for Yoga
1. Seated for Support- Chair yoga can be done while seated the whole class for those who can not easily stand during yoga. The chair would then provide you extra support so that you would not have to be standing while doing the poses. This is a gentle practice with deep stretches and is accessible to most people.
2. Standing for Balance- If you are using a chair during standing poses, it can be a great prop to offer you extra balance. As we saw with some of the poses above, many balancing poses can be difficult, but there are many ways to modify them using a chair. If you want to work on your balance and get better at standing and balancing poses, then using a chair for balance is a great option.
3. As a Prop- Chairs can make great yoga props, easily modifying many poses. A chair can be used to bring the ground up to you (like in triangle pose or downward facing dog) and it can allow you to do poses that you would not otherwise be able to by making it so that you do not have to bend down or fold as far forwards.
Body By Yoga’s Chair Yoga Programs
Did you know that we offer chair yoga classes? Our Yoga Start program is great for absolute beginners, or for those who are just looking to try out some chair yoga. This twenty-five minute class offers chair yoga for the inflexible. Checkout this program here!

Another one of our classes that offers chair yoga is our Yoga Vitality program. This program features four levels of poses, allowing you to pick which one works best for you with each pose and work your way up. There will always be multiple instructors modeling different versions of our poses. Our Yoga Vitality program is great for promoting healthy aging, or for anyone who needs a bit more support with room to grow during a yoga practice. Checkout this program here!

Reference:

Galantino, M. L., Green, L., Decesari, J. A., Mackain, N. A., Rinaldi, S. M., Stevens, M. E., Wurst, V. R., Marsico, R., Nell, M., & Mao, J. J. (2012). Safety and feasibility of modified chair-yoga on functional outcome among elderly at risk for falls. International journal of yoga, 5(2), 146–150. https://doi.org/10.4103/0973-6131.98242

Chair Yoga For Seniors – Here’s How To Modify A Traditional Yoga Routine To Match YOUR Level
Yoga for seniors has been becoming more popular as many have been learning just how effective the practice can be. As we grow older, our