


Have you ever wondered how far you need to bend in order to the side stretch correctly? What’s more important when trying to perfect this pose: a deeper side stretch or keeping your arms and shoulders back? For those who have technique OCD-ness like we do, keep on reading to learn how to perfect your standing side stretch. You’ll learn where you should be feeling the stretch when you are doing it correctly as well as common mistakes that beginners make. We’ll also show you what it looks like when you are doing the pose incorrectly.
Purpose
Here are some of the reasons why the Standing Side Stretch is good for you:
- Increases flexibility of the spine
- Strengthens the legs and feet
- Tones abdominals and surrounding core muscles
- Improves balance
- Increases mental focus and concentration
- Stretches deep low back muscles, helping to alleviate or prevent back pain and injury
- Increases lung capacity and function by expanding the muscles of the ribcage
- Stretches arms and shoulders
- Acts as an antidote to repetitive sitting
- Provides opening for the hips, increasing circulation, tone and range of motion

Pose Guide
In order to do side stretch correctly, here are the steps:
- Begin by standing with your feet together so that the toes of your feet are softly touching, and the heels are about an inch apart.
- Lengthen your spine and draw your shoulder blades down your back away from your ears.
- Inhale, lifting your arms overhead so that your palms are touching. Stretch your arms toward the sky as the palms gently press against each other.
- Continue to raise your hands to the sky as you lower your shoulders toward the ground.
- Internally rotate your arms so that your biceps are facing behind you.
- Lift the crown (top) of your head to the sky by lengthening the back of the neck. Keep the chin parallel to the floor.
- Pressing down through the balls and heels of your feet, lengthen your spine, getting as tall as you can as you inhale.
- Actively engage your core, and squeeze your thighs together.
- Gently lean your upper body to the right as you exhale.
- Your hips will shift lightly in the opposite direction.
- As you inhale, stretch your spine taller and longer. As you exhale, deepen the bend.
- Continue to engage your core and squeeze your thighs together.
- You should feel a stretch in your side from your hips all the way up to your arms.
- You should feel the muscles of your shoulders and upper back working.
- Inhale, returning to the upright position before exhaling to the left to complete the pose.
Practical Tips
Do This, Not That! Common mistakes beginners make:


Arching the back: There is a common tendency to arch the back in Standing Side Stretch, but this is not a back-bending pose. In order to do this pose correctly, keep your spine long and straight so the shoulders are never in front of or behind the hips. This keeps the spine aligned for maximum safety and benefit in the stretch.


Raising the shoulders up toward the ears: It’s a common mistake for beginners to elevate the shoulders up around the ears when doing poses where the arms are raised overhead. This is a mistake. It compresses the bones and compacts the muscles of the neck and shoulders creating unnecessary tension and possible nerve impingement. It is better to lower the shoulders away from the ears while lifting the crown of the head to the sky.

Compressing the neck: Another common mistake is to try to create more stretch by tilting the chin up toward the sky. This compresses the bones of the neck and the base of the skull straining the delicate soft tissues that support this area. The correct form is to lift the crown (top) of the head toward the sky while stretching the back of the neck and keeping the chin parallel to the ground.
Not squaring the hips forward: Turning the feet and knees away from each other externally rotates the hips in their sockets. This can aggravate low back and sciatica issues. Be mindful about aligning the legs so that the feet and knees face forward with a softness in the knees for best results. Turning the feet and knees in toward each other internally rotates the hips. This can add strain to the knees and the hips.

Bending one leg: It is preferable to keep both knees straight during Standing Side Stretch. (This doesn’t mean hyper-extending, or locking, your knees. See “Collapsing one side of the body” ) Bending one knee can create an imbalance in the posture so that one side is doing more work than the other. Stay balanced by keeping the legs straight, squeezing them together and pressing through the feet.

Collapsing one side of the body: It is important to keep both sides active in Standing Side Stretch. One side will be stretching while the other side will be actively building strength. If you are bending to the right, make sure not to collapse your right side, but rather engage it to support the stretch of the left side (and vice versa on the other side).
Twisting or rolling the shoulders: It is a common mistake to try to get a deeper stretch by twisting or rolling one shoulder forward. This diminishes the stretch available to the side body. Keep both shoulders facing forward as you bend to each side.
Forgetting to engage the core: Similar to ” Twisting or rolling the shoulders “, it is a common mistake to forget to activate the core during this pose. Keep the core actively engaged in order to create more stability for the pose as well as maximizing both the strengthening and the stretching benefits of Standing Side Stretch.
Props and Modifications
You should consider a modification if you experience the following:
- Excessive tightness in the outer hips and thighs
- Limited mobility in the ankles
- Excessive tension in the knees
- Weakened or underdeveloped core
- Excessive back pain/discomfort or tension
- Discomfort or restriction in the shoulders
- Tight or restrictive wrists
- Difficulty maintaining balance
Excessive tightness in the outer hips and thighs:
If you have excessive tightness or restriction in your outer hips and thighs, you can separate your feet to hip’s width apart to decrease the intensity of the stretch on the outer hips and legs.
Alternatively, you can try placing a block between your thighs and squeezing it to activate the midline muscles of your body. Engaging the inner muscles can help to release the outer muscles.

Alternatively, you can try placing a block between your thighs and squeezing it to activate the midline muscles of your body. Engaging the inner muscles can help to release the outer muscles.

A more restorative-style variation of this pose can be done by using a stack of folded blankets or pillows. Begin sitting on the floor with your weight shifted to your right hip and your legs curled around toward your left hip. Stack your blankets or pillows next to your right hip. Lower your body down onto the blankets/pillows allowing them to support the side of your body between your hip and your armpit. Support your head in your hands, or on a separate pillow.
You can also perform this pose on a chair. Choose a chair with a seat that is sturdy enough to support your spine (a soft or lumpy seat is not the best choice). Sit with your feet flat on the floor and your knees in line with your hips. The rest of the pose is the same as if you are standing. This takes the lower body out of the equation so that you can focus on the stretching benefits to the upper body without risking injury to the lower.
Limited mobility in the ankles:
If you have limited mobility in your ankles due to excessive tension or injury, you can modify this pose by stepping your feet hip’s width apart to lessen the stretch on the ankles.
Placing a block between your thighs and squeezing it can also lessen the intensity of the stretch at the ankles by activating the muscles of the inner leg and releasing the muscles of the outer leg.
Excessive tension or pulling at the knees:
The first thing to do here is to make sure you aren’t hyperextending or locking your knees. This puts undue stress on the joints and diminishes the strengthening action of the legs.
Activating the thighs more fully can provide added support for the knees. Engage the thighs by pressing them against each other.
Place a block between your thighs and squeeze it to more evenly distribute the work taking place in the legs.
If the knees are still feeling excessive tension or pain, practice this pose on a chair. Choose a chair with a seat that is sturdy enough to support your spine (avoid chairs with soft or lumpy seats). Sit with your feet flat on the floor and your knees in line with your hips. The rest of the pose is the same as if you were standing. This takes the lower body out of the equation so that you can focus on the stretching benefits to the upper body without risking injury to the lower.
Weakened or underdeveloped core:
Actively press the thighs against each other to encourage more engagement in the core muscles.
Place a block between your thighs and squeeze it to activate the core muscles.
Excessive back pain, discomfort or tension:
If your back is tight, tender or prone to injury, it can be helpful to practice Standing Side Stretch against a wall for safety and support. Stand with one side of your body facing the wall. Adjust your stance so that you are about two feet away from the wall. As you get to the point of the pose where you are leaning your upper body into the stretch, allow your hands to rest against the wall to aid you in supporting the pose.
This pose can also be done seated on a chair. For back injuries and limitations, choose a chair with padded, rounded arms—the larger, the better. Sit with feet flat on the floor, or curl your legs over to one side, tucking them next to your hip. Gently lower your upper body so that your side is supported over the arm of the chair. If curling your legs to one side, you will lean your upper body to the opposite side (i.e., if your legs are by your left hip, lean over the right arm of the chair). Feel free to add a blanket or pillow over the chair arm for additional support and comfort.
Discomfort or restriction in the shoulders:
If you experience pain or discomfort in your shoulders during this pose, you can do it without raising your arms overhead. Simply keep your arms hanging loosely by your side, or place your hands on your hips, as you stretch from side-to-side. Keeping the feet actively engaged against the ground can be extra helpful in this modification.
Alternatively, you can raise only one hand. To do this, you will raise the left hand if you are bending to the right, leaving the right hand at your side or on your hip.

Another option for tight shoulders is to use a strap. Hold one end of the strap in each hand, lift your arms (with the strap) over your head. Widen your hands as much as you need to perform the stretch without pain or restriction.

Tight or restrictive wrists:
If your wrists feel discomfort or limitation with the palms together, you can, instead, grab one wrist with the opposite hand. If you are bending the right, gently grab your left wrist with your right hand, alleviating any excess stress to the wrists. When bending left, grab the right wrist with the left hand.

Difficulty maintaining balance:
If you struggle with keeping yourself balanced in this pose, you can take your feet hip’s width—or even shoulder’s width—apart to increase the base foundation.
Alternatively, you can practice this pose against a wall. Stand with one side of your body facing the wall and adjust your stance so you are about two feet away from the wall. As you get to the point of the pose where you are leaning your upper body into the stretch, allow your hands to rest against the wall to aid you in finding balance in the pose.
Another variation is to practice this pose by standing next to a chair. Let the chair be at the side of your body toward which you’re bending. For instance, if you are bending to the right, the chair will be at your right side. As you lift your left arm to the sky, you can support yourself by placing your right hand on the back of the chair for stability (and vice versa on the other side).
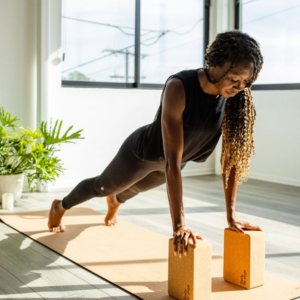
Bonus: Want to go deeper? Try challenging yourself by holding a block with your hands!

Pointers
Answers To Commonly Asked Questions
- What muscles does Standing Side Stretch work?
- Should I stick my tailbone out or tuck it under in Standing Side Stretch?
- When is Standing Side Stretch contraindicated?
- How far to the side should I lean in Standing Side Stretch?
- What do I do if I feel pinching in my back?
What muscles does Standing Side Stretch work?
Standing Side Stretch works many muscles of the body, but especially affects the muscles that attach to the ribcage, pelvic bones and shoulder girdle, and abdominals.
Should I stick out my tailbone or tuck it under in Standing Side Stretch?
Neither. The best position for the tailbone in Standing Side Stretch is a neutral one. Sticking the tailbone out compresses the low back creating the potential for pain, discomfort, nerve impingement and other injuries.
Tucking it under over-stretches the muscles, ligaments and tendons of the low back rendering them less capable of performing their stabilizing duties. This also makes the body more prone to pain and injury. Supporting the spine by engaging muscles of the front and back of the body equally, keeping the tailbone aligned with the rest of the spine, is the safest and best way to get the most out of this pose.
When is Standing Side Stretch contraindicated?
Acute neck and shoulder injuries
Acute sciatica pain
Late term pregnancy (Standing Side Stretch should be practiced with caution so as not to compromise the womb during late-term pregnancy)
Acute spinal injury or disease
How far to the side should I lean in Standing Side Stretch?
There is no perfect degree of bend to attain; you should bend as far as you comfortably can while keeping the core engaged, the feet active and the shoulders centered.
What do I do if I feel pinching in my back?
Decrease the intensity of the bend by bending over less. Press your feet into the ground, squeeze your thighs together, and engage your core. This should help protect the alignment in your back, eliminating any pinching.


Stretching and Strengthening your hips
In this workout we start slow to warm up your hips. Utilizing low impact workouts like this can be important for beginners and yoga veterans
Hatha vs Power yoga
We’ve created our own unique style of slow burn power yoga that combines Hatha yoga, power yoga, bodyweight exercises and physical therapy. This way in
The importance of maintaining correct alignment
Everything in your body is connected, so when one muscle isnt aligned properly it can be a slippery slope to injury. Building a solid foundation