STANDING HALF SPLIT


Purpose
Here are some of the reasons why Standing Half Split is good for you:
- Stretches the backs of the legs from the hips through the heels
- Strengthens the front of the legs
- Elongates the spine.
- Strengthens the core.
- Increases focus and concentration.
- Improves balance.
- Releases tension in the back of the neck and base of the skull.
- Stretches the muscles of the groin
Pose Guide
In order to do the Standing Half Split correctly, here are the steps:

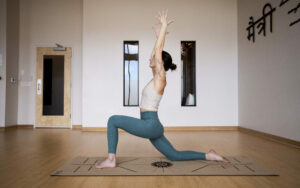
- Begin standing in the center of your yoga mat facing the short edge. Place your feet hip’s width apart. Let your arms rest easily at your side.
- Press your feet firmly into the ground. Squeeze your thighs toward one another as you lift them toward your hips.
- Lengthen your spine and engage your core as you inhale.
- Exhale to hinge forward at your hips, lowering your torso forward, and bringing your hands to the ground beneath your shoulders. Your back should be flat, not rounding. Pressing your hands against the ground can help activate the upper body to support the torso.
- Make sure you are still lengthening your spine and engaging your core. This should be a constant during the pose.
- Shift your weight into your left foot as you lift your right leg behind you. Your right leg will be straight and only needs to rise as far as you need it to feel a stretch in your left hamstring, right quadriceps, and groin muscles. Lengthen your foot away from your body while drawing your thighs toward your hips to get a nice, strong and active stretch through the leg.
- Do the same with the standing leg by pressing the foot firmly into the ground while raising the thigh toward the hip.
- Rotate both thighs toward the midline of the body.
- Repeat on the other side.
Practical Tips
Do This, Not That! Common mistakes beginners make:


1. Letting the hips twist out of alignment:
It’s common to see beginners twisting the hips in Standing Half Split so that the hip of the raised leg is twisting out away from the midline of the body. This can give the illusion of getting a fuller stretch. However, twisting the hips keeps you from getting the deep stretch in the hip flexors. The correct form is to keep your hips squared to the short front edge of your mat. Squeezing your thighs and rotating them in toward each other can help to keep your hips in the proper alignment.


2. Having the hands too close to the grounded foot:
When you bring your hands too close to your feet, you risk compressing your spine, as well as making it much more challenging to keep your balance. Instead, keep your hands placed under your shoulders, lengthening your spine and engaging your core to support your flat back. The distance between your hands and feet should be roughly the distance between your hips and your shoulders.


3. Locking the standing knee:
Beginners often make the mistake of locking the knee of the standing leg when practicing Standing Half Split. Locking the knee puts unnecessary strain on the joint, cheats the muscles of the legs out of the strength-building benefits of the pose, and decreases stability in the leg so that balancing is much more difficult. Instead of locking the standing knee, keep some softness in the knee by bending it just a little.
4. Rounding the back:
Rounding the back is another common mistake in Standing Half Split. Rounding the back is often an indication that the core is not being engaged. This can lead to injury and discomfort, particularly in the low back. To prevent rounding in the back, consistently engage your core and lengthen your spine. Engage your legs and your glutes for additional support.


5. Uneven weight distribution in the hands:
It’s important to keep your weight evenly distributed between your hands in Standing Half Split. This helps ensure that the shoulders stay squared to the short front edge of the mat and eliminates the risks of injury and pinching from twisting the shoulders. This also helps to build strength in both arms evenly.
6. Twisting the shoulders:
It’s all too common for beginners to twist the shoulders so that the chest is twisting in the direction of the raised leg. This can disrupt the even weight distribution of the hands and arms, leading to imbalances in strength between sides. It also can strain the spine and the many muscles that attach to it. For proper form, keep your shoulders squared and your weight evenly distributed between both arms and hands.


Props and Modifications
You should consider a modification if you experience the following:
- Overly tight or shortened hamstrings.
- Overly tight or shortened quadriceps.
- Excessive tension in the back, particularly the lower back.
- Difficulty maintaining balance.


1. Overly tight or shortened hamstrings
To accommodate overly tight or shortened hamstrings, one way to modify Standing Half Split is to bend your standing knee a little more. This decreases the intensity of the stretch in the back of the leg.

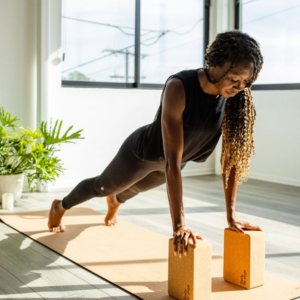
Another option is to elevate the torso to decrease the fold at the hips. You can do this by placing your hands on blocks instead of resting them on the ground. To do this, place the block in front of the standing leg and just to the inside. Grip the block only firmly enough to give yourself some balance and support. Do not put your full weight on the block. Keep the body actively engaged in doing the main work of the pose.

Alternatively, you can rest your hands (or forearms) on the seat of a folding chair.
You can also place your hands (or forearms) against a wall in front of you for support.
2. Overly tight or shortened hip flexors
If you feel tightness or restriction at the front of your hips and thighs, you can simply adjust how high you lift your raised leg. Only lift as high as you need to to feel a comfortable stretch.

Alternatively, you can do this pose with a wall about 3 feet behind you. This will allow you to rest your raised foot against the wall for support. The more actively you press your foot against the wall, the more you will intensify the stretch. Adjust the distance between your standing leg and the wall to accommodate your flexibility level.

3. Excessive tension in the back, particularly the lower back:
Providing support for the back while keeping it flat is critical to protecting it from unnecessary tension and discomfort. If you’re feeling excessive tension in your back, practice Standing Half Split with your hands or forearms resting against a wall in front of you. Continue to actively engage your core to build the strength needed to release the hands to the floor eventually.
Alternatively, you can rest your hands or forearms on the seat of a folding chair.
4. Difficulty maintaining balance:
Sometimes, finding balance in Standing Half Split can be as simple as slightly widening the space between your hands. Begin with each hand directly under your shoulders. Move each hand another inch or two away from each other to increase the surface area of your foundation.

You can also practice this pose with the support of a wall behind you. Begin with the wall about 3 feet behind you. This will allow you to rest your raised foot against the wall for support. Adjust the distance between your standing leg and the wall to accommodate your personal flexibility level. Eventually, begin lifting your foot away from the wall as you develop the strength and mobility in your legs to find balance without it.
Pointers
Answers To Commonly Questions:
- When is Standing Half Split contraindicated?
- What do I do if I can’t reach my hands to the ground in Standing Half Split?
- How much distance should be between my grounded hands and foot?
- How high should I lift my leg?
1. When is Standing Half Split contraindicated?
- Acute foot, knee, hip injuries
- Acute back injuries, particularly lower back injuries
- High blood pressure and similar cardiovascular conditions
- Injuries of the groin
- Acute hand, elbow, shoulder injuries
- Pregnancy – consult your healthcare provider
2. What do I do if I can’t reach my hands to the ground in Standing Half Split?
- There are many ways to modify Standing Half Split if you cannot reach your hands to the ground. Please see the section above to find the modification which best suits your body.
3. How much distance should be between my grounded hands and foot?
- The hands should be directly beneath the shoulders, while the standing foot should be directly beneath the standing hip. This means the distance between your grounded hands and feet will be roughly the same as the distance of your torso from your shoulders to your hips.
4. How high should I lift my leg?
- You only need to lift your leg high enough to get a comfortable stretch. With consistent practice, you will likely find that you can lift it higher and higher, but there is no ideal height. The priority is on keeping the proper alignment and feeling a stretch that is challenging but sustainable.
Additional Resources for beginners


Stretching and Strengthening your hips
In this workout we start slow to warm up your hips. Utilizing low impact workouts like this can be important for beginners and yoga veterans
Hatha vs Power yoga
We’ve created our own unique style of slow burn power yoga that combines Hatha yoga, power yoga, bodyweight exercises and physical therapy. This way in
The importance of maintaining correct alignment
Everything in your body is connected, so when one muscle isnt aligned properly it can be a slippery slope to injury. Building a solid foundation