
Purpose
Here are some of the reasons why Pigeon Pose is good for you:
- Opens the hips, increasing flexibility and mobility
- Stretches the hip flexors
- Can alleviate discomfort from sciatic impingement by stretching the piriformis muscle (deep muscle beneath the glutes)
- Tones the organs of digestion
- Strengthens the abdominal muscles
- Strengthens and stretches the glutes
- Improves running and squatting capabilities
- Stretches the spine and reduces tension surrounding the lower back

Pose Guide
Do’s—In order to do the Pigeon Pose correctly, here are the steps:
- Begin in a cross-legged seated position at the top of your mat. You will be facing the short edge of your mat.
- Shift your weight into your right hip so that it is on the ground and transition your left leg so that it extends out behind you in a straight line from your left hip. The top of your back foot will be resting on the ground.
- Redistribute your weight so that it is even between both hips. Let your glutes relax down into the ground.
- If you are very flexible in your hips, you can align your shin so that it is parallel with the top short edge of your mat. If you are less flexible, you can draw your foot closer to your groin to allow the outer thigh to rest toward the floor. Make sure the outer side of your shin is resting on the ground, not the top of your shin. Also make sure the inner thigh is facing the sky so that the outer thigh is resting on the ground. The rotation comes from the hip; you shouldn’t feel any pressure in the knee.
- Actively press your left foot against the ground to keep the left leg engaged with no weight resting on the knee joint.
- Keep your hips and shoulders squared forward toward the top short edge of the mat.
- Use your hands on the ground, with palms beneath your shoulders, for support.
- Lengthen your spine as you draw your shoulders down away from your ears.
- Walk your hands forward, lowering your chest toward the ground. Bend your elbows and rest your forearms on the ground for support.
- For maximum benefits, keep your weight in your hips.
- Engage your core and square your hips throughout the entire duration of the pose. This supports your spine and protects your low back.
- You should feel a deep stretch in the front of the back thigh and the outside of the right hip and glutes.
- Repeat on the other side.
Practical Tips
Don’ts—Common mistakes beginners make:


- Not engaging the core: Many beginners forget to engage the core (and keep it engaged) during Pigeon Pose. Allowing the core to relax during this pose can leave the back open for injury or pain. Keeping the core engaged provides the structural support for the muscles of the back as they extend through the full stretch of the pose.
- Putting too much weight on the back knee: Be careful to avoid putting too much weight on the back knee in this pose. You should never place direct pressure on the knee cap as it is a very small and unstable bone and can be injured easily. Press your back foot into the ground while engaging your core and lengthening your spine to support the pose without adding weight to the back knee.
- Letting the hips twist out of alignment: Some beginners can find it difficult to get the position of the hips right in Pigeon Pose. If your hips or legs are tight, you may find your hips twisting away from the bent knee and toward the back leg. This limits the stretch you are able to get from the pose, resulting in a missed opportunity for improving your mobility. The proper alignment is to have your hips square to the top of the mat, facing the short edge of the mat, with the weight evenly distributed between each hip. If your hips are too tight to maintain this position, please refer to the modifications below.


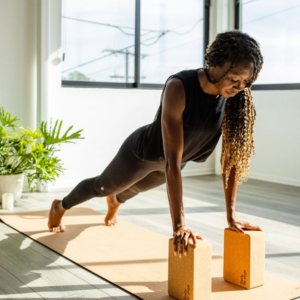
- Not externally rotating the front leg enough: Perhaps the most common mistake is not externally rotating the front leg enough. Beginners often bring the front leg forward and stop when the front of the shin faces down and touches the floor. To complete the stretch, externally rotate the front leg so that the outer side of the shin touches the floor instead. Note, beginners may not have the hip mobility to externally rotate the hips enough for the outer shin to touch the floor. See the modifications below to learn how you can use a block below the hips to help achieve the proper alignment.


- Taking the hips too far forward: It’s common to see people shifting the hips forward, lifting them off the ground, in Pigeon Pose. Instead, you should be shifting your hips back and down toward the ground. Most of the weight of this pose should be in the hips. If your hips are very tight and won’t sit all the way down on the ground, look below for how to modify the pose to make it safer and more comfortable for you and create more flexibility in your hips.
- Rotating back leg to the side: It’s also common to see the bag leg get rotated to the side, particularly if your hips are not squared to the front. Engage the hip and thigh of the back leg and actively extend backwards to avoid this mistake


Props and Modifications
Reason for modification—You should consider a modification if you experience the following:
- Excessive tightness and limited mobility in the hips and thighs
- Excessive discomfort in the knees
- Weakened or underdeveloped core
- Excessive tension or pinching in the back
- Discomfort or restriction in the shoulders


Excessive tightness and limited mobility in the hips and thighs:
- The easiest way to create more ease and comfort in Pigeon Pose when you have overly tight or limited mobility in the hips and thighs is to place some kind of support under your hips. A pillow or a block works great for this. Simply place the support under the hip that is unable to fully rest on the ground. This allows you to safely rest your weight into your hips while working at your own level of mobility. To do this, place the block on its low or middle height (depending on your needs) beneath your right glutes if your right leg is forward. You will still want to keep your weight evenly distributed through both hips, so don’t put all of your weight on the block.

- Beginners who are particularly tight in the hips should be careful about easing into the pose and about putting too much weight into the hips. To distribute some of the weight, beginners can use the ground to help support body weight. For even more support, use blocks to raise the height of the ground. This will help lessen some of the weight on the hips.

- If you are unable to externally rotate your hips, you can practice King Arthur’s Pose instead. To do this pose, begin on all fours facing the top of your mat. Make sure your knees are hip’s width apart. Bring your right foot forward and plant it just inside your right hand. Stack your right knee over your right ankle, and align your right hip with your right knee. Slide your left knee back just far enough to feel a stretch in the front of the thigh. Engage your core and press your front foot firmly into the ground. Shift your weight forward slightly to lift your back foot off the ground. Make sure you are not resting weight directly on the left kneecap. Instead, engage your core to provide lifting support, and place only a slight weight just above the left knee, if needed. Reach back with your left hand to grab your left foot. You can also use a strap, if needed, by holding one end of the strap in your left hand and looping the other end around the right foot or ankle. Keep the hips squared forward. Continue to engage the core, press through the right foot and shift the hips slightly forward to initiate the stretch in the front of the left thigh.

Excessive discomfort in the knees:
- Place a folded blanket under your back knee to add some cushion and support for the back knee.
- Alternatively, you can curl the back toes under, lifting the back heel off the ground (pointing it away from your hip). Then press through the ball of the foot to lift the knee just slightly off the ground. This may intensify the stretch in the front of the thigh for some, so proceed with caution.
- If you are feeling discomfort in the front bent knee, try elevating your hips off the ground by placing a pillow or block beneath your hips. This decreases the intensity of the bend in the front knee, while still receiving the many benefits of the pose.
Weakened or underdeveloped core:
- If you have difficulty keeping your core engaged during this pose, you can rest on your forearms or, if you have the flexibility, let your chest and belly rest on your front leg with your arms outstretched on the ground overhead. Let your forehead rest on a block or on the floor, respectively.
Excessive tension or pinching in the back:
- The first and simplest modification to make when feeling excessive tension or pinching in the back is to engage your core more actively. It’s easy to get caught up on what leg is going where and what to bend when, therefore forgetting to keep the core engaged. Active core support is what protects the back from being overstretched.
- Another modification is to take the hands forward a little so that the shoulders are leaning toward the hips. This decreases the arch in the spine, so that you can get a stretch without overdoing it.

- If you are struggling with an inflexible back in this pose, walk your hands forward letting your torso fold down toward the ground. You can rest on your forearms or, if you have the flexibility, let your chest and belly rest on your front leg with your arms outstretched on the ground overhead. Let your forehead rest on a block or on the floor, respectively.

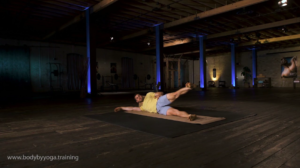
- Reclined Figure Four Stretch is another variation that can be practiced if you have excessive back tension. This pose is performed lying on your back on the ground, and provides additional support to the back. To do this pose, begin by lying on your back with your knees bent to the sky and your feet planted on the ground in front of your hips. Your arms can rest at your sides. Place the outside of your left ankle just above the right knee making a figure 4 shape with your legs. Reach through your legs to clasp your hands behind your right thigh, and gently pull your legs toward your chest. Keep your lower back on the ground. Press the left knee forward (away from the body) to increase the stretch. Press the toes of the left foot toward the left to activate the ball of the foot. Repeat on the other side.

- Finally, you can practice a variation using a chair called Gentleman’s Stretch. To do this, sit on a chair, place the outside of your left ankle just above the right knee making a figure 4 shape with your legs. Gently press your left knee toward the ground and sit up as tall as you can. Lift your chest forward and up as you hinge forward to intensify the stretch in the outer hip and glutes. This will feel like you are bringing your chest toward the wall in front of you rather than toward your legs. Flex your toes back toward your shin to activate the ball of your foot. Squeeze your inner thigh to keep the pose active. Try to externally rotate your hip so that your inner thigh is facing the sky and the outer thigh is facing the ground. Repeat on the other side.

Go Deeper:
- For those with a strong core and hip flexibility, try raising your arms up overhead during Pigeon Pose. Use your core to support the lifting of the posture.
- Alternatively, you can use a strap for support when raising your arms. To do so, hold one end of the strap in each hand, taking advantage of the tension in the strap to help lower your shoulder blades toward each other.
Common questions:
- When is Pigeon Pose contraindicated?
- What do I do if I feel pain in my front knee in Pigeon Pose?
- What do I do if I feel pinching in my back?
- What exactly are my hips supposed to be doing in Pigeon Pose?
- Should my back be rounded or straight?
- How close to my chest should my front foot be? Am I doing it wrong if my calf is too close to my chest?
- Should my foot be perpendicular to my body?
- If I feel a stretch in my outer leg, is that the same as my hip/glutes?
- Am I doing it wrong if I can’t externally rotate my leg so that the side of the shin is down but I still feel a stretch in my outer hips?
- Should both sides of my body be feeling the same?
- How much weight should I put into my hands/arms?
- Should my hands rest on the floor, on blocks, or on my elbows?
- Can I do this pose using my bed as a raised surface?
- Should I do this pose at the end of a session?
- How long should I hold this pose?
- To go deeper in this pose, would I put more weight into my hip? If so, how?
When is Pigeon Pose contraindicated?
- Spinal injury, including bone spurs, disc issues and fused vertebrae
- Acute migraine or tension headache
- Blood pressure disorders
- Acute knee and/or hip injuries
- Acute sciatica
- Pregnancy – consult your healthcare provider
What do I do if I feel pain in my front knee in Pigeon Pose?
- Pain in the front knee is often an indication that the hip is not fully externally rotated, so the knee is trying to take on the rotation instead. This opens the knee up to injury and should be avoided. See the section above to learn how to modify Pigeon Pose to alleviate pain in the front knee and practice the pose safely and more comfortably.
What do I do if I feel pinching in my back?
- If you feel pinching in your back, you are likely over-working your back and/or not engaging your core. Feeling pinching in the back signals the potential for injury. Refer to the section above for ways to modify this pose to alleviate excessive back pain and pinching.
What exactly are my hips supposed to be doing in Pigeon Pose?
- The hip of the front leg will be externally rotating. This means your inner thigh will be facing the sky and the outer thigh will be facing the ground. The hip of the back leg will be extending straight behind you so that the top of the thigh is facing the ground and the back of the thigh is facing the sky. Both hips are squared to the front of the mat facing the short edge.
Should my back be rounded or straight?
- Your back should be straight.
How close to my chest should my front foot be? Am I doing it wrong if my calf is too close to my chest? Should my foot be perpendicular to my body?
- How close your front foot and calf are to your chest will largely depend on the degree of flexibility in your hips. The aim is to get your torso as close to your front leg as you comfortably can while maintaining proper alignment. Having the front foot perpendicular to the body will intensify the stretch and promote best alignment in the front leg.
If I feel a stretch in my outer leg, is that the same as my hip/glutes?
- The muscles of the outer leg are different than the hips and glutes, but they are closely related. The hips are a joint that connects the legs to the torso. The glutes are the primary muscles of your butt. Many people will feel a stretch in the outer legs as well as the hips and glutes.
Am I doing it wrong if I can’t externally rotate my leg so that the side of the shin is down, but I still feel a stretch in my outer hips?
- The proper alignment is to have the outside of your shin resting on the ground, along with the outside of your thigh. However, if your hips are overly tight or restricted, you may have difficulty finding the full rotation. In this case, it is recommended to modify the pose. See the modifications section above to find the modification that will best serve your needs.
Should both sides of my body be feeling the same?
- In this pose, the two sides of the body are in two different positions. Because of this, they will be experiencing different sensations as different muscle groups are being stretched and strengthened.
How much weight should I put into my hands/arms?
- The hands/arms are only there for additional support. They should not be receiving the full weight of the pose. Evenly distribute the weight between your thighs, glutes and core with minimal weight in your hands/arms.
Should my hands rest on the floor, on blocks, or on my elbows?
- This will depend on your flexibility level. The fuller expression of the pose is to have the forearms on the ground, but you may need to modify the pose by placing your hands on the ground or on blocks as you work to develop the necessary flexibility.
Can I do this pose using my bed as a raised surface?
- Yes. It works best with a bed that is higher off the ground, as low profile beds may be too short. To do this, stand facing the side of the bed. Shift your weight into your left leg to raise your right knee and foot to the bed. Place it on the bed as you would on the floor. Once in position, hinge forward by lifting and reaching the chest toward the opposite edge of the bed (not toward your leg). Repeat on the other side.
Should I do this pose at the end of a session?
- There is no defined timing for practicing this pose during your session. However, you may find it easier and more comfortable to practice it later in your session so that your hips and legs have a chance to warm up first.
How long should I hold this pose?
- There is no set time for holding any pose. However, a good starting point is 5-10 breaths or 30-90 seconds.
To go deeper in this pose, would I put more weight into my hip? If so, how?
- The weight should remain evenly distributed through both hips during the pose. You can create intensity by deepening the forward fold (lowering the belly closer to the ground) and pressing the feet into the ground.
Additional Resources for beginners


Stretching and Strengthening your hips
In this workout we start slow to warm up your hips. Utilizing low impact workouts like this can be important for beginners and yoga veterans
Hatha vs Power yoga
We’ve created our own unique style of slow burn power yoga that combines Hatha yoga, power yoga, bodyweight exercises and physical therapy. This way in
The importance of maintaining correct alignment
Everything in your body is connected, so when one muscle isnt aligned properly it can be a slippery slope to injury. Building a solid foundation