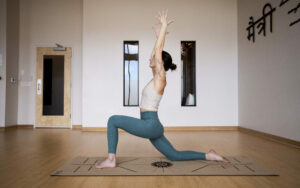
EXTENDED SIDE ANGLE


Purpose
Here are some of the reasons why Extended Side Angle Pose is good for you:
- Lengthens the spine.
- Strengthens the legs and feet.
- Tones abdominals and surrounding core muscles.
- Improves balance.
- Increases lung capacity and function by expanding the muscles of the ribcage.
- Increases mental focus and concentration.
- Strengthens arms and shoulders.
- Stretches the sides of the body.

Pose Guide
In order to do Extended Side Angle Pose correctly, here are the steps:
- Begin by standing in a wide stance facing the long edge of your mat.
- Turn your left foot inward slightly to about 85-degrees.
- Pivot on the right heel to point the toes out toward the right. Your toes will be facing the short edge of the mat.
- Bend the right knee so that it stacks on top of the right ankle.
- Squeeze your right knee toward the outside to engage your hips and glutes.
- Squeeze your legs toward one another.
- Lengthen your spine, lifting your ribs away from your hips.
- Raise your arms to shoulder height in a “T” position with palms facing the ground. The elbows should be straight but not locked. Stretch your arms, so they are actively reaching away from each other.
- Lower the shoulders down away from the ears.
- Bring the right wrist inside the right knee while extending your left hand toward the sky. Both palms face forward toward the long edge of the mat. Keep both arms actively stretching away from each other to facilitate a stretch through the chest and shoulders.
- Engage your core as you tighten the left side of your body.
- Rotate your left shoulder back to stalk directly over the right shoulder, opening the chest.
- Turn your head to look up at the sky.
- Draw your left ribs toward your hips to engage your core more intensely.
- Inhale to get taller and lengthen your body.
- Exhale, sinking deeper into the pose.
- Repeat on the other side.
Practical Tips
Do This, Not That! Common mistakes beginners make:
1. Raising the shoulders toward the ears:
It’s a common mistake for beginners to elevate the shoulders up around the ears, especially when doing poses where the arms are raised overhead. This is a mistake as it can weaken and compact the neck and shoulders creating unnecessary tension and possible nerve impingement. It is better to lower the shoulders away from the ears while extending and flattening the back of the neck.


2. Misalignment of the shoulders:
Another common error in Extended Side Angle Pose is rotating the shoulders incorrectly. The top shoulder should be stacked directly above the bottom shoulder. Do not let it roll forward or behind.


3. Bent knee going too far past the ankle:
Some beginners find the bent knee shifting too far forward over the ankle in Extended Side Angle Pose. This moves the weight into the knee and takes it out of the hips. This pose is about building strength in the hips. To get the full benefit and protect your knees, adjust the stance so that the bent knee is stacked directly over the ankle.


4. Taking the butt backwards in the lunge:
It’s common to let the butt slip back behind you while in Extended Side Angle Pose. When this happens, you will also find the low back arching and the chest shifting forward. Instead, keep your hips squared toward the long edge of your mat between your feet. Keep your shoulders directly over your hips with your spine long and straight.


5. Rounding the side body:
Rounding the side body is a common mistake in this pose. When this happens, we lose the core and hip strengthening benefits of the pose. The proper form is to keep the side body straight, strong and lengthened. This moves the primary effort of the pose down into the hips and activates the core muscles for maximum strength.


Props and Modifications
You should consider a modification if you experience the following:
- Excessive tension or restriction in the feet and ankles
- Weak or injured knees.
- Overly tight, inflexible hips.
- Discomfort or restriction in the shoulders.
- Difficulty maintaining balance.


1. Excessive tension or restriction in the feet and ankles:
If you have excessively tight ankles or feet, you can adjust the position of your back foot so that it is at a 45-degree angle instead of being fully perpendicular.

2. Weak or injured knees:
For knee injury or excessive knee tension, you can modify this pose to a Low Lunge by lowering the back knee and foot to rest on the ground. The back foot shouldn’t rotate but should remain in line with the rest of the leg. Placing a folded blanket under the back leg can add additional comfort and support.
3. Overly tight, inflexible hips:
If you have overly tight hips or sciatic pain, avoid rotating the back foot. Instead, curl the back foot’s toes under, lifting the heel off the ground to remain on the ball of the foot. Align the back foot with the rest of the leg. The elevated heel will be pointing behind you, and the toes will be pointing forward.
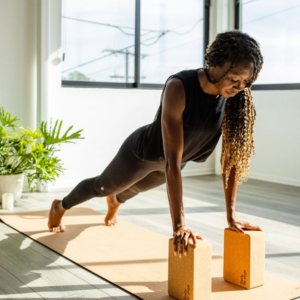
Another modification for tight hips is to lessen the bend at the hips. Do this by either resting your lower hand on a block or resting the elbow of your lower arm on your front thigh. The block will be best for those with only mild restrictions, and placing the elbow on the thigh will provide more support for those with greater inflexibility. Keeping the feet actively engaged against the ground can be extra helpful in this modification.


4. Discomfort or restriction in the shoulders:
If you experience pain or discomfort in your shoulders during this pose, you can simply rest the hand of your upper arm on your waist or let the arm rest at your side.

A less intense modification for the shoulders is having the upper arm reach straight up toward the sky instead of angling it by the ear.

5. Difficulty maintaining balance:
If you struggle to maintain balance in Extended Side Angle Pose, you can allow your head to turn toward the lower arm so that you are gazing at the ground instead of up at the sky.
You can practice this pose against a wall if you find the balancing aspect challenging. Begin by standing with your right side against the wall. Step back with your left foot. Follow the instructions above to continue building the pose, leaning against the wall anytime you need additional support.

Pointers
Answers To Commonly Asked Questions:
- What muscles does Extended Side Angle Pose work?
- When is Extended Side Angle Pose contraindicated?
- Should my raised arm be straight up toward the sky or reaching over my head beside my ear?
- If using a block with the grounded hand, should the block be inside or outside of the front foot?
1. What muscles does Extended Side Angle Pose work?
- Increases strength and stamina in the muscles of the legs, hips and feet.
- Creates a deep stretch in the sides of the body, particularly the intercostal muscles between the ribs, the serratus anterior, and the rotator cuff muscles.
- Builds strength in the arms and shoulders.
2. When is Extended Side Angle Pose contraindicated?
- Acute neck and shoulder injuries.
- Acute sciatica pain
- Acute spinal injury or disease.
- Vertigo and other balance impairments.
- High blood pressure.
3. Should my raised arm be straight up toward the sky or reaching over my head beside my ear?
- The fuller expression of the pose is with the raised arm reaching toward the front of the mat and aligned beside the ear. However, it is perfectly acceptable to reach the upper arm directly up toward the sky. This decreases the intensity of the stretch in the side of the body.
4. Should the block be inside or outside the front foot if using a block with the grounded hand?
- The answer to this question depends on your flexibility level. If you are more flexible, you can place the block against the inside edge of your foot. If you are less flexible, it will be better to place the block against the outside edge of your foot.
5. Should my arms be locked in Extended Side Angle Pose?
- The arms should never be fully locked at the elbow. This puts unnecessary stress on the joint and decreases the strength-building potential in the arms and shoulder muscles. Keep the arms straight, but with a slight softness at the elbow to fully engage the muscles of the arms.
Additional Resources for beginners


Stretching and Strengthening your hips
In this workout we start slow to warm up your hips. Utilizing low impact workouts like this can be important for beginners and yoga veterans
Hatha vs Power yoga
We’ve created our own unique style of slow burn power yoga that combines Hatha yoga, power yoga, bodyweight exercises and physical therapy. This way in
The importance of maintaining correct alignment
Everything in your body is connected, so when one muscle isnt aligned properly it can be a slippery slope to injury. Building a solid foundation